
LOVE YOUR AMAZING FACE!
When it comes to my face, I’m the typical, yet frustratingly confusing, combination skin-type. I’ve got that embarrassingly dry “T-Zone”, where dry, flaky skin on the bridge of my nose and brow line make it look like I don’t know how to blow my nose properly (Especially during the winter!), but then I’m oily everywhere else. If only my jawline and hairline would just share some of that natural sebum production with the rest of my face (Instead of turning into pimples!), my face would be in perfect harmony with itself! What’s more, I also frequently experience some pretty major morning eye-puffiness too. Ugh! What’s a person to do? You could try spending a small fortune on crazy-expensive skincare products, or you could give my face soap recipe a try and see if your skin loves it just as much as mine does!
Of course, everyone’s skin-type is different and unique to them, so what works wonders for me might not be what works wonders for you, and that’s totally okay! This recipe is extremely adaptable, and any additive, oil and/or butter can be swapped out for anything that your own unique skin-type prefers best. Just be sure to run the recipe through a lye calculator whenever making any substitutions or changes to the batch oils. My hope in sharing the step-by-step process of how this face soap recipe is made is that you’ll either find your own skin responds wonderfully to it, or you’ll find an excellent “foundation recipe” from which to begin customizing your own facial soap recipe from; one tailored specifically to what your skin craves most!
I formulated this recipe a little over two years ago and just continued to adjust, tweak and expand upon it until I hit that facial soap “sweet spot”! For the base oils themselves, this recipe includes olive oil (for its gentle mildness and moisturizing properties), coconut oil (for cleansing, lather and bar hardness), shea and cocoa butters (for hardness, creaminess, and conditioning), avocado oil (for its nourishing mildness and moisturizing properties), and castor oil (for its humectant properties, as well as its conditioning and lather-boosting qualities). Now, admittedly, I’m the type of soap maker who usually doesn’t deviate much from the “KISS rule” (as in, “Keep It Simple, Sunshine!”), so when I see a soap recipe with this many different fats, it tends to give me a severe case of eye-twitch! Out of the many different recipes and formulations I’ve tried though, this is the one recipe my face has always loved most, and I don’t argue with my face- very often!
The additives in this recipe are what really turn it up a notch and take things to a whole new level! For this project, we’ll be using the recipe’s olive oil to make a superbly potent infusion with rosemary powder! We’ll also be incorporating French Green Clay, hydrolyzed quinoa protein, a lye solution consisting of ginger root tea and raw cane sugar, and utilizing black seed oil as the recipe’s main superfat! When all is said and done, we’ll have an amazing batch of soap that I like to call “Your Amazing Face!” Handmade Soap! Before jumping right into the project though, let’s take a look at this recipe’s additives and discuss what they can potentially bring to the table within the finished bars of soap!
AMAZING FACE-LOVIN' ADDITIVES!
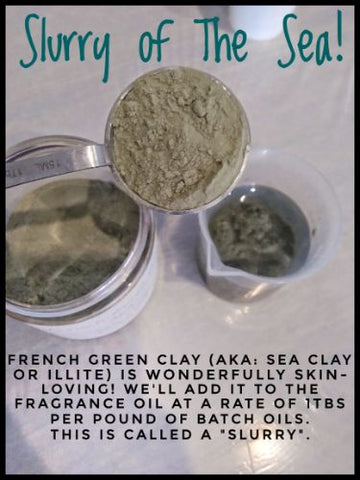
French Green Clay, also known as Illite Clay, Green Montmorillonite Clay or Sea Clay, is wonderfully purifying, clarifying and oil absorbing, making it especially beneficial for those with combination or oily skin. It’s said to detoxify and draw impurities from the skin’s surface, as well as help with circulation. Additionally, many eczema sufferers prize French Green Clay for its ability to ease the symptoms of mild to moderate eczema. Comprised of decomposed plant material, such as seaweed and kelp, it’s collected from sea beds in the Montmorillonite region of France, and is extremely rich in nutrients.
When it comes to rosemary, or rosemary powder, I can personally confirm that no other ingredient or additive has benefitted my skin as noticeably fast as rosemary has! Now, keep in mind that what my own skin may respond marvelously to, yours may not, so please note that this isn’t a claim, promise or guarantee, rather, just me sharing my own personal experiences with this herbal additive. Rosemary is said to help soothe and calm skin irritation, as well as help to smooth and brighten uneven skin-tone. I’ve easily noticed all of these benefits in my own experiences with rosemary, but my absolute favorite part about incorporating rosemary into my daily skincare regimen is how fast and drastically it makes my morning eye-puffiness vanish within minutes! My skin just responds extremely well to it, and apparently, I’m not the only one! Many rosemary enthusiasts, including myself, swear by how skin-loving, beneficial and effective it is for maturing skin in particular. Although it’s a big “NO GO” when it comes to making any health and/or cosmetic-related claims about what one's handmade soaps can do for the skin (other than clean it), I’m a firm believer that rosemary is simply one of those ingredients which speaks for itself!
Black seed oil, also known as cumin seed oil, is prized for having a plethora of skincare uses and benefits; so many in fact, there's simply too much to list! Excellent for all skin-types, black seed oil is naturally antibacterial, as well as highly regarded for its antioxidant and anti-inflammatory properties. Many crafters who swear by black seed oil’s benefits in their handmade goods actually enjoy using it more like an essential oil than a base oil. One reason is due to its distinctive aroma, which is fantastically green and herbal! Its natural scent comes though beautifully in soap formulations, but is easy to mask or compliment with other fragrances too, if preferred. I personally relish the aroma of blackseed oil, as it carries a very subtle, peppery undertone. This only helps to enrich and enhance its main scent, which to me, smells just like chopped, fresh parsley! It’s beautifully lush, green, fresh and herbal without being overwhelming on the senses. However, I should add an important word of caution... If you receive black seed oil that smells similar to kerosine or turpentine, the only thing it should be added to is the trash bin! This odor is a telltale sign the oil isn’t fresh and has well exceeded its expiration. Make sure to always purchase your black seed oil from a reputable supplier.
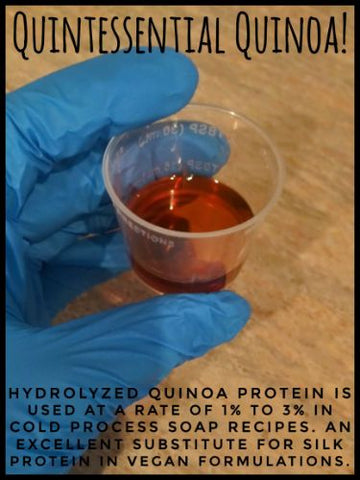
Hydrolyzed quinoa protein is an excellent substitute for tussah silk for those crafters who wish to keep their formulations vegan-friendly. In soap, it delivers similar qualities as tussah silk by imparting a luxuriously silky feel and creamy lather. Known for its skin conditioning properties, it doesn’t take much to reap the benefits of quinoa protein. Just like tussah silk or oat protein (Another excellent additive!), a little goes a LONG way, so it’s typically used at a rate of 1% to 3% per pound of oils in soap formulations. In its raw state, it actually smells a bit like molasses to me, but once incorporated into a lye solution, it changes to a rather unpleasant ammonia-type odor. This is due to the addition of lye, doing what lye does best- scorching things! Worry not though, quinoa protein won’t impart any scent to your handmade soaps, so the initial ammonia-type odor is very temporary. As its name implies, Hydrolyzed quinoa protein is super abundant in protein, and as a rich emollient, is said to moisturize and soften the skin too. Boasting anti-irritant, antioxidant and restorative properties, it’s prized for being beneficial for all skin-types, and is high in skin-hydrating amino acids. Not just for skin, hydrolyzed quinoa protein is amazing in haircare formulations too!
The ginger root tea/raw cane sugar liquid-alternative we’ll be using in leu of distilled water within this recipe is one of my personal favorite alternative liquids for soap making, and for good reason! Not only are ginger root and raw cane sugar natural skin conditioners, but their inclusion in cold process soap recipes makes for an abundantly rich, silky-smooth, copious lather that’s easy to work up! If you’re interested in learning more about how I came across this exceptional, skin-loving combination, and why I love using it as an alternative liquid in my soap recipes, check out my guest blog entitled, “Of Additives & Unruly Patchouli!”.
Each additive plays an important part in making this soap recipe thoroughly awesome, and although they’re equally as adaptable and interchangeable; able to be substituted for any other additive you feel will work better for your specific skincare needs (For example: Kaolin Clay instead of French Green Clay, wheat protein instead of quinoa protein, or an infusion of calendula instead of rosemary.), it’s the black seed oil which plays the most important role of them all, in terms of purpose. The black seed oil is what we’ll use to make up the majority of the recipe’s superfat. The oil itself can just as well be substituted for any other skin-loving oil you feel your skin might benefit better from, but as for the purpose it serves as the recipe’s main superfat, it’s important to stay consistent. For example, if one were to choose to substitute the black seed oil for rosehip seed oil, the rosehip seed oil would then become the recipe’s main superfat.
In my personal experience, I find my skin really enjoys face soap formulations if I superfat a little higher, but not too high. Too low of a superfat and my sensitive skin feels dry and uncomfortably tight after use. Too high, and I trade much needed cleansing properties for excess oil, and/or a bar of soap which develops DOS (Dreaded Orange Spots) before I’m able to use all the bars. I really aim to keep the recipe’s superfat anywhere between 7% and 8%. That seems to be the “sweet spot” for my combination skin, and the black seed oil is how we’ll get there- mostly! By reserving the black seed oil as extra, or “unaccounted for” oil (Which we’ll add to the soap batter once the process of saponification has begun.), its incorporated amount brings the recipe’s superfat to approximately 6.2%. Now, the recipe itself is superfatted at 1%, so the addition of the black seed oil will ultimately bring the recipe’s total superfat to approximately 7.2%. To create a beautiful “buffer” between that 7% to 8% “sweet spot” I mentioned, it’s the cocoa butter in this recipe that steps up to the plate! Cocoa butter contains “unsaponifiables”, meaning some of the molecules within the butter won’t bond with a lye molecule to saponify and become soap. They remain unchanged and “free-floating” within the soap to add even more skin-loving goodness! In a nutshell, it’s the recipe’s 1% superfat, the inclusion of cocoa butter, and the addition of black seed oil which brings us precisely to that superfat “sweet spot”!
ONE LAST (SORTA CONTROVERSIAL) ADDITIVE... LET’S TALK FRAGRANCE!
If you’ve ever Googled face soap recipes before, you’ve probably had it drilled into your head that you can’t use fragrance oils in face soap formulations. Instead, you should go the “safer” and/or “gentler” route of using essential oils to scent your soap. Well, I’m here to ruffle a few feathers (Not intentionally, of course!), and tell you that this well-meaning advice isn’t entirely accurate. Now, don’t get me wrong, if you’d prefer to use an essential oil, or essential oil blend, in your face soap recipes, there’s absolutely nothing wrong with that, and you can certainly do so! I personally adore the beautiful aromas of essential oils, and enjoy using them in various mediums often! Provided you know the proper usage rate(s) of the essential oil(s) you wish to incorporate into your recipe, keeping your soaps scented at a skin-safe level, you’re completely free to use any lovely essential oil, or oil blend, that you’d like. However, the truth of the matter is that you’re free to do the same with fragrance oils too!
When it comes to face soap formulations, some crafters feel or believe that fragrance oils are “bad”, “harsh” or simply “unsafe” to use on sensitive, more delicate skin areas. To help dispel some of the worry that might bring with it, think about what you use on your body. For me personally, the vast majority of body soaps I make are made with fragrance oils, and when I use and enjoy these soaps in the shower, I also (*ahem*) use them to clean more delicate areas of my body too- with no issues or irritation. The reason for this is because I stay within the IFRA safety guidelines for any particular fragrance oil I incorporate into my recipes. Another factor to keep in mind comes from a purely economic standpoint. Some essential oils can be downright expensive, and soap is a wash-off product. Strictly on a personal basis, I much prefer to reserve my more expensive oils and additives for leave-on products, where their full benefits will be enjoyed most. When it comes to the use of fragrance oils, I trust that the skin-safe guidelines and maximum usage rates set in place by the International Fragrance Association, or IFRA, are safe, accessible and dependable.
The notion that essential oils are “safer” or “gentler” than fragrance oils is simply unfounded. While the use of essential oils in various skincare applications isn't regulated by any governing entities, fragrance oils very much are. In fact, fragrance oils are actually far more regulated and tested in terms of topical use and various skin-safe usage rates than essential oils are. There are some essential oils that just shouldn’t be applied topically at all, and others that individuals with certain medical conditions should avoid entirely. While I’m personally no essential oil expert, and therefore have no concrete answer as to how much of a certain essential oil should be used within a particular handmade product to stay within skin-safe parameters, I know exactly how much of a certain fragrance oil I can use to remain well within those safety guidelines.
I just prefer to stick with what I know to be safe within various handmade products, at varying usage rates, via the information provided to me by the IFRA. Like myself, if you aren’t an expert in essential oils, but you carry doubts concerning skin sensitivity and the use of fragrance oils in face soap formulations, my best advice would be to dial down the fragrance oil usage rate to a more comfortable level. Instead of the standard 6% typically used in body soaps, try a usage rate closer to 3% for your face soap formulations.
One of the most pivotal lessons I’ve learned while navigating through my soap making journey has been the realization that just because something isn’t 100% natural doesn’t mean it’s “bad” or “unsafe”; and vice versa... Just because something is 100% natural, or naturally-derived, doesn’t automatically make it safe. Arsenic is 100% natural, but I’ll skip that one as an additive! Another enlightening realization I’ve come to rely on is not to immediately fear what I don’t know, or jump to conclusions and immediately label something as “bad”. Those chemical-sounding words can certainly seem intimidating, but the whole world and everything around us is actually a chemical! Water is a chemical, and even unfamiliar chemical names are often quite familiar once we know what they are. For example, Ascorbic Acid is simply the chemical name for Vitamin C, and Sodium Chloride is more commonly known as table salt!
It’s very true that fragrance oils are made with synthetic ingredients, but “synthetic” is not synonymous with “bad”. Along with synthetic aromatics, many fragrance oils also contain essential oils and other naturally-derived aromatic isolates and/or botanicals too. Because I trust the safety standards and guidelines the IFRA provides me with, I very much enjoy using fragrance oils in my face soap formulations, and have never once experienced any undesirable effects or results from doing so; even with my ridiculously sensitive skin! For this specific recipe, we’ll be using a truly outstanding fragrance oil from Nurture Soap that I absolutely love, and have enjoyed working with before! At the end of the day though, it really boils down to what you prefer best, and what gives you the results you want to achieve in your own soapy creations. Soap making is uniquely personal and wonderfully customizable that way!
LET’S MAKE AMAZING FACE SOAP!
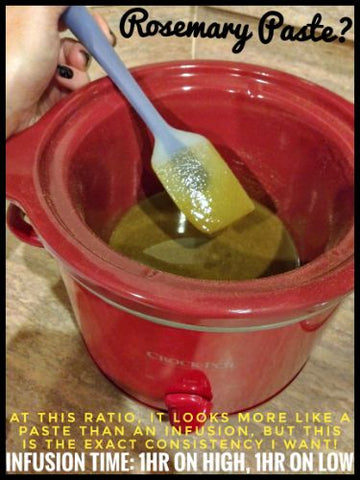
There is a bit of pre-preparation that comes with making this face soap recipe, but it’s so totally worth it! The very first step to making “Your Amazing Face!” Handmade Soap is to make the rosemary infusion. Pure rosemary powder is used in this recipe at a rate of 1-part rosemary to 5-parts olive oil. For this specific project, that means combining 2oz of pure rosemary powder (by weight) with 10oz of olive oil. 2 ounces of anything might not sound like much, but this is actually a very concentrated infusion! The rosemary will impart a subtle, but very present and lovely, herbal aroma to the finished soaps.

To a crockpot, combine both the rosemary powder and the olive oil, and give this mixture a good stir. This is probably when you’ll notice just how rosemary-concentrated this infusion really is, since it’ll look more like paste than an infusion! Not to worry though, this is the exact consistency we want the mixture to be at. We’ll start the infusion on high heat for an hour, then turn the heat to low for one more.

At the end of a 2-hour infusion time, you’ll definitely know your infusion is done because your entire home will smell like rosemary! From here, we’ll remove the infusion from the heat and allow it to cool to a more skin-safe temperature.

Once cooled, we can now strain the infusion. Even as a finely-ground powder, rosemary can be a bit abrasive on the skin, so you’ll want to strain the infusion very thoroughly. I’ve found washable/reusable cloth coffee filters to be the absolute best tool for the job! The rosemary powder is just too fine, even for a fine-mesh tea strainer, so these very inexpensive cloth filters are a soap maker’s best friend! As the mixture is being strained, try to squeeze every last drop of that fabulous rosemary infusion from the rosemary powder. To ensure the infusion is strained thoroughly, be sure to run the infused oil through the filter at least two times.

And there we have it! A fantastically potent rosemary infusion! As you can see, the color of the olive oil has changed to a very rich, dark, green color, and the infusion itself will smell amazingly fresh, green and herbal. We’ll allow the infusion to cool down to room temperature while we get the next step underway!

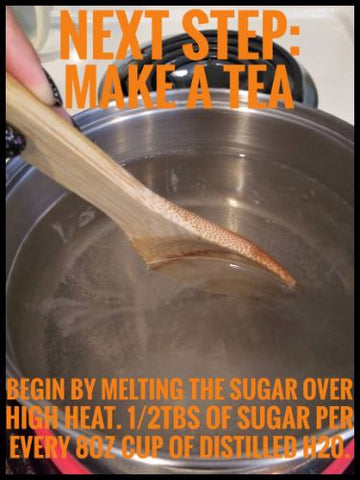
The next ingredient to prepare is the ginger root tea with added raw cane sugar. You can make as little or as much of this as you’d like, since ginger root tea and sugar are awesome in any soap recipe, and having extra already made and on-hand is never a bad idea! To a large pot, begin by keeping track of how many 8oz cups of distilled water you’ve added. We’ll start by dissolving the raw cane sugar into the distilled water first. For every 8oz cup of distilled water added to the pot, we’ll add 1/2TBS of sugar. As an example, if you’ve added 8 cups of distilled water to your pot, you’ll want to incorporate 4TBS of raw cane sugar. Over high heat, stirring frequently, heat the distilled water until the sugar has completely dissolved, and the water is nice and hot; perfect for steeping tea.
Remove the pot of sugar-water from the heat and add the ginger root tea. I like to use tea that lists ginger root (or “rhizome”) as its only ingredient, but any tea where ginger root is the main ingredient will work just fine! We want our tea to be strongly brewed, so for each 8oz cup of distilled water, we’ll add 2 bags of tea (paper tags removed). Going back to our example from above, this means that if we have 8 cups of distilled water in our pot, we’ll add 16 bags of ginger root tea. Allow the tea to steep for 10 to 15 minutes, then remove the teabags, squeezing the excess liquid from them. Lastly, strain the tea, then place it in the refrigerator to chill.

With the herbal infusion and tea completed, it’s time to get into the nitty-gritty of it! First order of business will be to make the lye solution with the chilled ginger root tea/raw cane sugar liquid-alternative. After weighing this alternative liquid out, but before adding the lye to it, we’ll want to get the hydrolyzed quinoa protein added to it first. Considering how much such a small amount benefits soap recipes, I’ll add 0.35oz of hydrolyzed quinoa protein to the ginger root tea. For this 32oz batch, that's a touch over a 1% usage rate, which I've rounded up to make it easier to weigh out on my MyWeigh KD8000 scale.

Carefully weigh out and add the lye directly to the ginger root tea liquid-alternative, stirring well until the lye has completely dissolved, and the liquid begins to go from cloudy back to clear. With our alternative liquid mixture, the lye solution won’t fully return to being pristinely clear again, and will eventually settle to an amber or golden-brown color. As long as the lye is fully dissolved though, we’re good to go! As the quinoa protein heats up, emitting that temporary ammonia-type odor, it may also form a bit of foam on top. If this is bothersome to you, you can absolutely pour the lye solution through a fine-mesh strainer when it comes time to add it to the batch oils. For now though, we’ll set the lye solution off to the side and allow it to cool down to at least 85 degrees Fahrenheit.

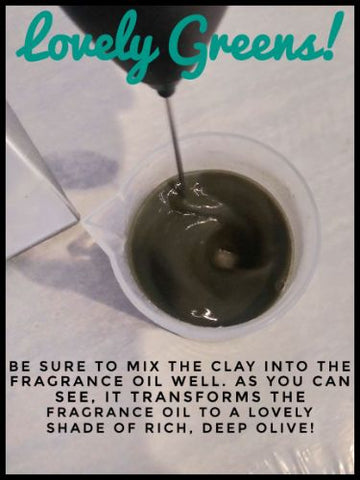
As the lye solution cools, we’ll continue by getting a clay “slurry” made with the fragrance oil and the French Green Clay. The fragrance oil we’ll be using for this project is spot-on perfect! As our black seed oil superfat and rosemary infusion impart their own wholesome, herbal aromas to the recipe, this fragrance oil comes in to enhance and compliment them beautifully! They all just blend together so exceptionally well, and smell divinely green, herbal and floral-fresh in the cured soaps. The fragrance oil I speak of is none other than Nurture Soap’s fantastically fabulous “Rose Geranium” fragrance oil! A dead-ringer for the pricey essential oil of the same name, “Rose Geranium” fragrance oil smells like a gorgeously fresh rose (not stuffy, “outdated” or heady), with a lovely botanical accord. It’s so delightfully fragrant and long-lasting in application, we can certainly dial down that usage rate to 3%, or 0.5oz per pound of oils (a touch over 3%), and still enjoy its magnificent “rosy-ness”!

To create a clay slurry, we simply need to weigh out the fragrance oil, then add the French Green Clay to it. In this recipe, we’ll incorporate 2TBS of clay directly into the fragrance oil, which is a usage rate of 1TBS of clay per pound of batch oils. Per your own skincare needs, you can most definitely add less or more French Green Clay to your slurry, as desired.
Clay is heavier than oil, so as you prepare your slurry, you’ll notice the clay settling to the bottom of the mixture. Simply take a mini-mixer and mix the slurry well to disperse the clay evenly throughout. Eventually, the clay will make its way back down to the bottom of the mixture again, but so long as you give it another good mixing, just before adding the slurry to your soap batter, you’ll be right as rain! The lovely color of French Green Clay will come to life once added to the fragrance oil, creating quite the glorious shade of deep, dark green!
Once the clay slurry is made, we can get another great additive prepared by weighing out a bit of sodium lactate, then setting that off to the side as well. Sodium lactate is a salt solution derived from the natural fermentation of sugars found in beets and/or corn. As well as being a skin-loving humectant, sodium lactate also helps aid in the unmolding of soap, cutting down the length of time your finished batch must remain in the mold. In my own cold process soap recipes, I enjoy incorporating sodium lactate at a usage rate of approximately 3% per pound of oils.
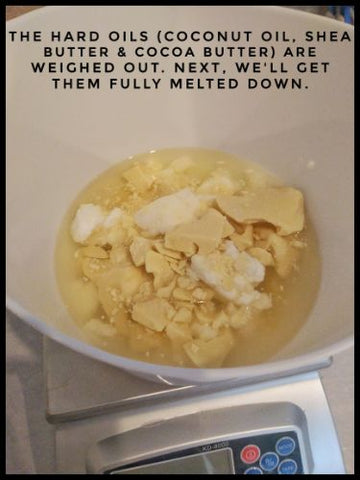
We’ll move on by getting the recipe’s batch oils weighed out now, beginning with the hard fats, which are oils or butters that are generally solid at room temperature. For this recipe, those would be the coconut oil, shea butter and cocoa butter. Once combined, we’ll pop them in the microwave to get them fully melted.
The hard fats will be quite hot once we’ve thoroughly melted them down, so just as we did with the lye solution, we’ll want to give these fats a chance to cool down a bit. I prefer to begin the soap making process when my batch oils have cooled down to around 85 degrees Fahrenheit, and my lye solution has cooled down to anywhere between room temperature and 85 degrees Fahrenheit. While waiting for the hard fats to cool down, we can continue by getting the recipe’s superfat prepared. Since we’ll want to add this extra oil to the soap batter at trace, after saponification has been initiated, this is a great oil to pre-disperse colorants into too!
I know you must be thinking, “But Amber! Isn’t our recipe naturally green enough?”, and the answer to that question is, “Yes... For now!”. You see, with the inclusion of the rosemary infusion, our batch oils may look pretty potently green right now, but as the soaps cure, this herbal infusion will eventually turn the soaps a golden-tan color. Incorporating a bit of green mica will help to give this recipe that little added boost it needs to remain an eye-catching shade of olive green throughout cure. With equal parts “Celadon Green” and “Winter White” micas, we’ll make a soft, soothing shade of green, which we’ll disperse directly into the black seed oil.

As the hard fats cool, we can help speed that process along by incorporating the rest of the recipe’s batch oils. Only the soft oils remain (fats which are liquid at room temperature), and those include the rosemary-infused olive oil, avocado oil and castor oil. Once all the recipe’s fats have been fully weighed out and combined, it shouldn’t be too long before they reach that perfect soap making temperature!

Of course, there just has to be one last thing before the real fun begins! Oh, who am I kidding? It’s all fun, from start to finish! Those batch oils though- boy are they dark! To give our soft-green mica-blend the best fighting chance of transforming into a wholesomely herbal shade of olive-green within the batch, we’ve got to tame down some of that darkness! The best way to do this is with Nurture Soap’s Titanium Dioxide. 1/2tsp per pound of oils of Titanium Dioxide, dispersed well in a splash of distilled water, is all that’s needed to help lighten things up a bit! Once we’ve dispersed the Titanium Dioxide and set it off to the side with our other additives, it’s time to get this soap making party started!

To the cooled lye solution (comprised of ginger root tea, raw cane sugar and hydrolyzed quinoa protein), we’ll begin by adding both the sodium lactate and pre-dispersed Titanium Dioxide directly to it, stirring well to fully incorporate.

Next, slowly and carefully pour the lye solution into the batch oils, gently pouring it through a fine-mesh tea strainer as you do so, if preferred. As if it were your very own blending baby, give that stick blender of yours a good burping to bring any trapped air bubbles to the surface, then blend the soap batter past emulsion, to a light trace.


Once you’ve reached trace, go ahead and add the recipe’s main superfat and colorants, by way of the mica-blend we previously dispersed into the black seed oil. With just a few, short pulses of your stick blender, or preferably by hand, make sure to get the mica/black seed oil mixture fully incorporated, and combined evenly throughout the soap batter. You’ll notice this will take the soap batter from a lovely shade of golden-tan to an equally lovely shade of olive.

Next up, we’ll get the fragrance oil and French Green Clay slurry incorporated. Give this mixture one last blend with a mini-mixer, then add it directly to the soap batter. Forgetting all about your stick blender, use a spatula or whisk to get the fragrance oil/clay slurry fully combined within the soap batter by hand. It’s time to get this batch poured!

I wanted each side of the finished soaps to be as flat and rectangular as possible, so for me, the best mold for the job was Nurture Soap’s 2.5lb Tall, Skinny Mold. If you don’t own this particular mold, or a tall, skinny mold in general, any mold you have available to you will work just as well, including homemade molds lined with freezer paper. There is absolutely nothing wrong with your handmade soap being poured into a handmade mold. In fact, it’s quite fitting!
Using a spatula to smooth over the top of the soap as best as possible, I decided this would be the perfect batch to CPOP, which stands for “Cold Process, Oven Process”. This step is completely optional, and if you’d rather not CPOP your own batch of soap, simply insulating it under a cardboard box, draped with a towel or blanket, is perfectly A-Okay! If you would like to CPOP your batch as a means of inhibiting gel phase, simply pre-heat your oven to 170 degrees Fahrenheit, place the batch on the center oven-rack, then turn the heat off. Allow the soap to remain in this ambient heat overnight, without being tempted to open the oven door to take a peek!

For now, all that’s left to do is give yourself a big pat on the back, and a friendly hug from me... You’ve just made a killer batch of handmade face soap- from scratch!
YOUR AMAZING BATCH OF SOAP – UNMOLDED!
Woohoo! It’s the next day and we’re ready to unmold and cut our batch of cold process face soap! Unmolding this batch only reinforced just how much I love CPOP soap, but even if you skipped this step, I know you’re going to love your own batch of handmade face soap just as much! The added sugar in this recipe should’ve helped things heat up quite nicely all on their own, so your chances of ending up with a gloriously gelled batch of soap are looking pretty good either way!

If you’ve read any of my previous guest blogs, it might be slightly obvious that I never know when to leave well enough alone! I think I’m physically incapable of leaving a batch of soap undecorated in some way or another, so If you’ve got more self-control than I do, all that remains of finishing up this soap project is getting it cut, then cured for 4 to 6 weeks. After that, you’re free to lather-up and thoroughly enjoy every minute of it! Strictly from a personal standpoint, I just really enjoy adding a little “something extra” to my soap batches, and you’re more than welcome to create these “finishing touches” right along with me if you’d like. You could also choose to omit them entirely if preferred, and that would be absolutely fine too!
If you choose to continue the project by adding that “something extra” to your own soaps, once you’ve cut the batch into bars, grab some of Nurture Soap’s Low Sweat, Clear Soap Base, and any small embed mold(s) of your choice; it’s time to make some decorative embellishments! Here, I’ve made little fern-leaf embeds in a blend of equal parts “Alpine Green” and “Cabin Fever” micas, with just a pinch of “Savage Garden” mica to deepen the shade. With the ever-so-delicate “Oleander” mica, tiny rose embeds create a serenely elegant color combination!

With a small scraping tool or non-serrated knife, gently scrape off the top layer of soap from each embed, and round-off any sharp edges and/or corners too. Test the embed to make sure it’ll sit flush against the face of the cold process soap bar.

Using a paintbrush, saturate the backside of the embed with a mixture of distilled water and any mild, skin-friendly, liquid soap of your choice (about 1/2TBS liquid soap to 1oz of distilled water). Place a small dab of this water/soap mixture onto the face of the cold process soap bar too; just on the area where you’ll be placing the embed.

Place the embed onto the cold process soap bar, then apply gentle, yet steady, even pressure for 20 to 30 seconds; until the embed will remain adhered to the cold process soap on its own.

Lastly, take a cotton swab and gently clean up around the edges of the embed. Allow the decorative embeds to remain undisturbed for at least 24 hours, while the two types of soap bond to each other. That’s all there is to it! Once fully cured, your pretty soap embellishments will stay firmly affixed to your cold process soap bars until you hack them off with a chainsaw, or use the bars in a bath or shower, whichever comes first!

YOUR AMAZING FACE!
Did you know... There are 21 mimetic muscles in the human face which are the only muscles in the whole body directly attached to the skin? These muscles form the entire foundation of your unique face!
Involuntary movements around the eyes are what distinguish a true smile from a fake one. A true smile not only involves the mouth area, but also a narrowing of the eyelids too. Anyone can fake a smile, but it’s virtually impossible to fake a sincere or genuine one!
The most genuine, or truthful, of facial expressions, from happiness to anger, elation to sadness, fear to contempt, shock, surprise, awe and more, are almost always symmetrical. Think about that the next time you ask your pre-teen how their day was; then spend way too much time contemplating if their expression was perfectly symmetrical or not!
Not all of our genuine facial expressions are easy to read. Humans regularly flash “micro-expressions” which last less than 1/25th of a second! Some emotions are expressed so quickly, faster than the blink of an eye, many are unable to even catch them, consciously or subconsciously, before they’re gone.
Using just your face, you’re capable of making over 10,000 different expressions!
Out of the entire body, it’s the face that actually has the largest range of muscle groups, with 43 of them being directly linked to how you outwardly express your emotions!
These fun and interesting facts are only a few examples of the many ways your face is positively amazing! I know I could make some cliché comment about how much more amazing your face could be if you tried my face soap recipe, but I’m not going to do that. Why? Well, for starters, it’d be an insincere way to finish this blog. Yes, your face is amazing, but there’s literally nothing out there that’s going to make it even more so! You could try the most expensive lotions and potions on the planet, but in all truthfulness, it’s really the person behind the face that truly makes it amazing! Of course, a healthy dose of confidence is always a great way to help boost one’s self-image, as when you feel confident and radiant outwardly, it tends to resonate inwardly too (And vice versa!). This soap recipe is just one of many ways to help your skin look cleansed and beautiful on the outside, but what really makes your face amazing is YOU! Rock on with your bad selves, my amazing fellow soap makers!

"YOUR AMAZING FACE!" COLD PROCESS FACE SOAP RECIPE:
FORMULATED FOR A 32OZ BATCH, WITH NURTURE SOAP’S 2.5LB TALL, SKINNY MOLD RECOMMENDED. FOR A DIFFERENT BATCH-SIZE, PLEASE RUN THIS RECIPE THROUGH A LYE CALCULATOR. THIS RECIPE HAS BEEN ROUNDED UP OR DOWN, RESPECTIVELY, TO BE MYWEIGH KD8000 SCALE-FRIENDLY! **PPO = PER POUND OF OILS**
- Sodium Hydroxide (Lye) at 1% Superfat = 4.6oz
- Ginger Root Tea/Raw Cane Sugar Alternative Liquid at 33.33% Lye Concentration = 9.2oz
- > 1% PPO Hydrolyzed Quinoa Protein (*Added to alternative liquid.) = 0.35oz
- 30% Rosemary-Infused Olive Oil = 9.6oz
- 25% Coconut Oil = 8oz
- 15% Shea Butter = 4.8oz
- 10% Cocoa Butter = 3.2oz
- 10% Avocado Oil = 3.2oz
- 10% Castor Oil = 3.2oz
- > 6.2% (1oz/PPO) Black Seed Oil (*As additional superfat.) = 2oz
- < 3% PPO Sodium Lactate = 0.95oz
- < 3% to 0.5oz/PPO “Rose Geranium” Fragrance Oil = 0.95oz to 1oz
- 1TBS/PPO French Green Clay (*Added to fragrance oil.) = 2TBS
- 1/2tsp/PPO Titanium Dioxide (*Dispersed in distilled water.) = 1tsp
- 1tsp/PPO “Celadon Green”/ ”Winter White” Mica-Blend at 1:1 (*Dispersed in black seed oil.) = 2tsp
- Nurture Soap’s Low Sweat, Clear Soap Base:
- Decorative Embeds in “Alpine Green”, “Cabin Fever” & “Savage Garden” Mica-Blend
- Decorative Embeds in “Oleander” Mica