

NORTHERN EXPOSURE
I’ve always wanted to see the northern lights in person... I just wish it didn’t have to be so cold to do it! Although I’ve only seen the aurora borealis in documentaries and photographs, I’m almost positive two things are for certain: First, I have a strong feeling pictures and film just don’t do it justice (And even then, it still looks stunning!). Second, being a dweller of the humid south (And a total wimp when it comes to cold weather!), I'm sure the experience of seeing those prismatic lights dance across the northern sky is so totally worth it! Sadly, it simply isn’t possible for me to hop on my make-believe private jet and take an impromptu trip northward; but when you can’t go somewhere yourself, there’s always a way to bring that “somewhere” to you! Through the art and inspiration of soap making, I decided to try my hand at bringing the colors of the northern lights to life within a batch of handmade soap. Let’s grab our pretend scarves and coats, and take a mental vacay up north, shall we? I’d be delighted if you’d join me on this imaginary journey, as we set out to make a batch of “Aurora Borealis” Handmade Soap together!
To get an idea of the array of colors I wanted to include in this project, I needed to find some visual inspiration first; a picture I could refer back to in order to match-up the colors of the northern lights as best I could. Lucky for me, there’s a whole world of talented photographers out there who are willing to share their beautiful artistry with “photography-challenged” individuals, such as myself! I looked through dozens of uncopyrighted photos, hoping to find inspiration in a picture I could share here too (Legally!), and ended up striking gold! With gratitude to the amazing photographer who captured this stunning scene, here’s the picture that ignited the color-inspiration for this project...

BOREALIS-WORTHY BLENDS!
This batch of soap features optional soap frosting on top, with equally optional decorative embeds. If you’d like to include these as well, the first order of business will be to get the embeds made (I highly recommend using Nurture Soap’s “Low-Sweat, Clear Soap Base”!). I chose moons and sparkling jewels for my soapy decorations, but anything related to the night sky, the brisk outdoors, or the colorful beauty of the aurora borealis will do just as wonderfully! I used “Snowflake Sparkle” mica to make my mini-moons glow, then accentuated the detail of their faces by brushing a little “Neutral Gray” mica over them. For gems that would shine like stars in the Milky Way, “Shamrock Gold” enviroglitter and “Rainforest” mica proved to be the perfect, shimmery shades!

The main focuses of this sudsy creation are the color-blends we’ll be creating (Using Nurture Soap’s fabulous mica colorants!), and the design itself. Before we get started though, please make safety your top priority by meeting the requirements of the project first... It’s extremely important to have thorough, firsthand knowledgeable of safe lye-handling practices, and a clear understanding of basic cold process soap making, prior to beginning this handmade project.
Within the batch are seven striking color-blends (Plus an additional blend for the soap frosting.), which were blended to match the main colors featured in our inspirational photo as closely as possible. Whenever I mix micas to create a color-blend for a specific project, I like to give that blend its own unique name. I’ve found this helpful for a couple reasons: First, when explaining to others how, or when, to incorporate specific color-blends into various projects, easy-to-remember, relatable names make referencing them much easier, rather than having to describe them by the sum of their parts each time. Another helpful reason for giving each color-blend a name involves future soap projects. I always keep a “color journal” of blends I’ve used in past soap batches, and having a name to refer back to helps me create a mental association with its color. This mental association enables me to better recall from memory what a specific blend looked like, so I can use it again in a different project.
With that said, the names I gave the color-blends we’ll be mixing-up for this project include: “Radioactive”, “Little Green Martian”, “Tidal Wave”, “Blue Jean Baby”, “Purple Majesty”, “Cosmic Violet”, “Pitch Purple” and “Darkest Denim” (“Darkest Denim” being for the optional soap frosting.). Please refer to the list below to see which Nurture Soap colorants were used to make these blends, and how you can create them too! How much of each color you’ll need depends on the size of your batch and how vibrant you want your soap to be. For a portion-size of approximately 8 ounces of raw soap batter, about ½ teaspoon of colorant is an excellent place to start! If you crave an even brighter, bolder look, gradually add a little more color until you reach your desired results.


LIST OF “AURORA BOREALIS” COLOR-BLENDS:
“Radioactive” (neon lime-green): Equal parts: “Full Throttle” mica-blend & “Force of Nature” mica-blend.
“Little Green Martian” (bright green): Equal parts: “Force of Nature” mica-blend & “Emerald Green” mica.
“Tidal Wave” (teal blue-green): 2 mini-scoops “Emerald Green” mica; 1 mini-scoop (each): “Making Waves” mica-blend, “Caribbean Blue” mica & “Winter White” mica.
“Blue Jean Baby” (soft blue): Equal parts: “Making Waves” mica-blend, “Caribbean Blue” mica & “Winter White” mica.
“Purple Majesty” (medium purple): Equal parts: “Making Waves” mica-blend, “Queen for A Day” mica-blend, “Celestial Silver” mica & “Winter White” mica.
“Cosmic Violet” (violet-purple): Equal parts: “Queen for A Day” mica-blend & “Celestial Silver” mica.
“Pitch Purple” (purple-black): 2 mini-scoops “Nocturnal” mica; 1 mini-scoop (each): “Klein Blue” mica & “Fantasia” mica.
“Darkest Denim” (dark blue-purple *for soap frosting): 2 mini-scoops (each): “Klein Blue” mica & “Dark Navy Blue” mica; 1 mini-scoop “Queen for A Day” mica-blend.
DESIGN PLANS, RECIPES, AND THE PERFECT AURORA-AROMA!
The design for this project is an old classic with a slight “’twist”. To create the look of this soap, we’ll use a hanger tool. However, instead of keeping the soap batter thin in order to create those classically-fluid swirls, we’re going to pour the soap batter at a much thicker trace. Why in the heck would we intentionally torture ourselves with a thicker, less “manageable” consistency? The answer lies in the magnificent light-show the aurora borealis puts on for its captivated audience, and in the way its spectacular waves of light seem to almost slice through the very sky itself! When we pour the soap batter at a thicker consistency, the end-result of a hanger-swirl turns out looking quite different. Instead of displacing the colors within the batch to create fluid-like swirls, pulling a hanger tool through thick soap batter actually breaks through the colors. Similarly, since the northern lights don’t “swirl” across the sky, so much as they appear to “slice” or “break” through it, I thought this particular design-technique would fit perfectly with the theme of this project! We’ll cover the precise movement of the hanger-tool (I drew one of my “world famous” diagrams!) when we reach that point in the soap making process.
When I think of the northern lights, I think of a cold and vast night sky, stretching on forever over a pristinely frozen landscape. This project needed something frosty, organic and crisp to tell its aromatic story, and I knew just the fragrance oil for the job! Featuring supremely fresh, invigorating notes of mint, eucalyptus and lemongrass, Nurture Soap’s “Eucalyptus and Mint” fragrance oil takes me to snow-covered plains, brisk mountaintops and majestic, icy glaciers every time I smell it! I love everything about this aromatic masterpiece, and it blends exceptionally well with other aromas too! I especially love how the smallest amount of bergamot essential oil seems to really amplify each and every note in this magical blend, so I couldn’t resist creating this special concoction again for this project! Excellent substitutes for the bergamot essential oil in this aromatic blend include lemongrass, lime or litsea cubeba essential oils, but if you don’t have any of these on-hand, please don’t be discouraged... “Eucalyptus and Mint” fragrance oil smells downright marvelous all on its own; no additions needed!

Since we’ll be working with a thicker trace to create this soap design, you might be wondering what kind of cold process soap recipe to use. The answer is simple and wonderfully versatile: Any cold process soap recipe will work great for this project, and you’re completely free to use your personal-favorite recipe, if you have one in mind! If you’re unsure of any one recipe in particular though, I recommend Nurture Soap’s “Nurture Soap Making Oil Blend”.
You can find the recipe below if you’d like to use oils you already have on-hand to make it, or you can purchase it from Nurture Soap as a pre-measured, pre-mixed base. The “Nurture Soap Making Oil Blend” is a failproof, super-convenient way to skip the fuss and get right to the fun of soap making! Just add your lye solution, optional colorants and/or fragrance, and you’re on your way to making fantastic batches of handmade soap! I really enjoy this recipe because it’s very “crafter-friendly”, regardless of one’s level of experience. Its forgiving formulation makes reaching and controlling your desired consistency of trace easy and manageable. For a soap project, such as this, where we’ll be working with a thicker trace-consistency, a forgiving recipe that remains on its best behavior makes for an all-around stress-free soap making experience!
CREATING THE HEAVENS!
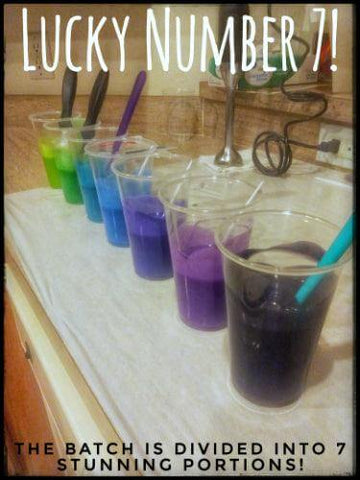
Once things have cooled down to around 85 degrees Fahrenheit, and we’ve carefully added our lye solution to the batch oils, the first step is to blend the soap batter until it begins to take on more of a medium-like consistency. You’ll know you’re there when drizzles of soap batter from your stick blender remain visible on the soap’s surface for a second or two, then quickly disappear again. This is a great place to stop, as it’ll give us time to separate the batter into seven portions, as well as get each one colored and fragranced. Split your first six portions fairly evenly to one another (Eye-balling this is totally fine... Nature doesn’t come in perfect proportions either!), then split-off the seventh portion to have just a touch more soap batter than the previous six.
The finished soaps should follow the color spectrum of the aurora borealis, so the order in which we’ll pour the first six portions of soap batter is important. From the first portion to the last, the order of pour is as follows: #1: “Radioactive”, #2: “Little Green Martian”, #3: “Tidal Wave”, #4: “Blue Jean Baby”, #5: “Purple Majesty”, #6: “Cosmic Violet”. The seventh color-blend (“Pitch Purple”) will be poured in-between each portion, so that the finished soaps appear as if the colors themselves are cutting through the night sky. Start by pouring about 95% of the “Radioactive”-colored soap batter into the bottom of your mold, then pour a generous pass of “Pitch Purple” soap batter directly over it. Allow the soap to displace itself wherever it pleases... The best part of this design is purposely not achieving perfection, or having to worry about making straight layers!

From here, it becomes a process of repetition. With the second color (“Little Green Martian”), repeat the process by pouring about 95% of it directly over the previous pour. Follow-up with another pass of “Pitch Purple” soap batter. Again, allow the soap batter within the mold to become naturally displaced with each subsequent pour. Continue until each portion has been poured, ending with the soap batter colored in “Cosmic Violet”. Don’t worry if you find yourself running low on “Pitch Purple” soap batter as you near the end of pour; so long as each color has at least some “Pitch Purple” soap batter sandwiched in-between it, you’re good as gold!

By the time you finish pouring, it’s possible the soap batter will have gone from thick to thicker, but don’t let this worry you, or make you feel rushed. A beautifully thick consistency is perfect for this project, and we’ve got plenty of time to create a gorgeous design! When pulling a hanger tool through the soap, we want to “slice” through it rather than swirl it, and it’s this wonderfully thick consistency which makes that possible! We’ll finish-up this part of the project by adding colorful dollops of remaining soap batter to the top of the batch. With hanger tool in-hand, we’ll be ready for the next step!

NO MATTER HOW YOU SLICE IT!
Beginning at the side nearest you, bring your hanger tool all the way down the side of the mold until you reach the bottom. Slide the tool across the bottom to the very center of the mold. In big, counter-clockwise loops, begin to gradually move the hanger tool upward with each completed loop. Move the hanger tool in large, frequent, ascending loops, being sure to span the width of the mold too. Continue this motion until you reach the top. The actual number of loops you complete isn’t important, just try to do as many as your mold will allow room for. Although not even remotely professional-looking (Admittedly, I’m terrible at drawing!), here’s a diagram of what the movement of this hanger-swirl/slice looks like...

If you’ve never pulled a hanger tool through soap batter quite this thick before, most likely, it’s going to feel like you’re royally messing things up on the inside of your batch! The soap batter will feel stiff and unforgiving, which may leave you questioning whether you did it correctly or not. If these thoughts cross your mind, then I guarantee, you’ve done it correctly! Pulling a hanger tool through thick soap batter feels downright weird, but I promise it’ll turn out great!
Once finished with the hanger tool, be sure to give your mold a few hearty whacks against a solid surface. As it is, thicker soap batter has a higher chance of developing gaps, trapped bubbles and/or air pockets throughout the batch, and pulling a hanger tool through it only increases those odds. Show those air pockets you mean business by thoroughly tapping the mold down against a hard surface, such as the floor, or a sturdy countertop. Follow-up by smoothing the top of the batch with a spatula (If adding soap frosting.), or creating a lovely textured-top (If omitting the soap frosting.).

If you’d like to continue by blending up a batch of soap frosting for the top of your soap, I’ve included my favorite soap frosting recipe below... Please feel free to use or adjust it any way you’d like! For the soap frosting part of this project, I used a color-blend I call “Darkest Denim” to color the batch, and was instantly smitten the moment I dispersed it throughout the soap frosting batch oils! In its dry state, “Darkest Denim” appears purple, but when dispersed in oil, it transforms into an intense and mesmerizing shade of blue! In cold process soap however, its purple tones come back out to play, leaving me to question if it’s purple or if it’s blue. Decidedly, it’s a little of both, but any which way you slice it, it’s a positively stunning color-blend!

Feel free to embellish the top of your soap frosting the same way I did here, or in any way inspiration guides you! When it comes to summoning your inner soap artist, there’s absolutely no such thing as a “right” or “wrong” way of doing things. For this specific design, I chose a round piping tip to create a soft, fluffy-looking top, then added a generous glimmer of “Snowflake Sparkle” mica. To bring a bit of the heavens down to earth, I carefully placed my decorative embeds on top, then completed the project by insulating the batch overnight.

CHOOSE YOUR OWN NORTHERN ADVENTURE!
When I first began forming the idea of an aurora borealis-themed project, I had actually planned on making a landscape design, complete with night-covered evergreens and a dark, jagged mountain range beyond. I had already created outlines of mountains and pine trees on cardboard cutouts I intended to drag across multiple layers within the batch, but at the very last minute, I ditched the idea entirely. The reason was simple: While landscape designs look awesome in soap, they’re more of an intermediate to advanced soap making technique. I wanted to make this project an “everyone-friendly” one; a project all soap makers could equally enjoy!
While my hope is that experienced soap makers will find inspiration in this project, using it to expand upon the concept, design and/or colors within it; I truly hope newer soap makers will find enjoyment and inspiration in it also... Enjoyment in blending-up some outrageously fun colors, and inspiration in how surprisingly easy and beautiful it can be to work with soap at thicker consistencies too! When all was said and done, I ended up with an unexpected surprise myself! For reasons only science or "the soap gods" can explain, the top of my own batch of “Aurora Borealis” Handmade Soap developed some crazy-beautiful soda ash! Soda ash is totally harmless, but often regarded as one of those unsightly nuisances to be prevented or eliminated. In this case however, the way it makes the very top of each bar appear as if it's being bathed in moonlight, I love it too much to fight it! Embrace your inner creativity and new soapy adventures, but readily embrace the unexpected too... After all, it’s these elements combined that make for the best soap making experiences and outcomes!


THE RECIPE:
*This recipe contains the same batch oils and percentages as Nurture Soap’s “Nurture Soap Making Oil Blend”! This wonderfully convenient, no-fuss, pre-mixed blend makes fantastic bars of handmade soap, and is available on Nurture Soap’s website!
- Lye Superfatted at 5%
- Distilled Water at a 33% Lye Concentration (2:1/Water: Lye)
- 40% Olive Oil
- 25% Coconut Oil
- 25% RSPO Sustainable Palm Oil
- 5% Castor Oil
- 5% Sweet Almond Oil
- 6% “Eucalyptus and Mint” Fragrance Oil
- 1.6% (.25oz/PPO) Bergamot Essential Oil (*Can be substituted with lemongrass, lime or litsea cubeba essential oils, or omitted entirely.)
- 3% Sodium Lactate (*Optional. Stirred into cooled lye solution.)
- 1/2TBS to 1TBS/PPO: White Kaolin Clay (*Optional. Mixed into fragrance oil or batch oils.)
Approximately 1tsp/PPO of The Following Color-Blends: “Radioactive”, “Little Green Martian”, “Tidal Wave”, “Blue Jean Baby”, “Purple Majesty”, “Cosmic Violet” & “Pitch Purple” (*To make these colors, please see: “List of Aurora Borealis Color-Blends" under the subheading: “Borealis-Worthy Blends” above.)
SOAP FROSTING:
- Lye Superfatted at 5%
- Distilled Water at a 33% Lye Concentration (2:1/Water: Lye)
- 35% Olive Oil
- 30% RSPO Sustainable Palm Shortening (AKA: “No-Stir Palm”)
- 25% Coconut Oil
- 10% Castor Oil
Approximately 1tsp/PPO: “Dark Denim” Color-Blend (*To make this color, please see: “List of Aurora Borealis Color-Blends" under the subheading: "Borealis-Worthy Blends" above.)
Micas for Optional Melt & Pour Embeds: “Snowflake Sparkle” Mica, “Neutral Gray” Mica, “Shamrock Gold” Enviroglitter & “Rainforest” Mica
Optional Mica-Dusting in “Snowflake Sparkle” Mica