

Dreaming About Soap Making!
The inspiration for this week’s soap design and blog actually came to me in a very, very weird dream... Steve Buscemi and I had taken the big, swirly waterslide (Excellent mode of transportation!) to a local café, where he, his dog and I got into a deep discussion about fragrance oils (Oddly, this isn’t the first time Steve Buscemi and I have hung out together in a dream, OR ridden the big, swirly waterslide!). I asked him where I could find a soap scented in “Passion Fruit and Marbled Molasses” (I don’t know where my brain would come up with such an odd combination!), and he had explained that I could make my own marbled molasses and mix it with a passion fruit fragrance oil. I don’t know what “marbled molasses” even is, but it does sound tasty, and what he described to me made perfect sense! He told me that micas were soluble in marbled molasses, so I could even make all these wonderful colors with it in my soap, if I wanted to! How he described adding these colors to my soap had me feeing utterly excited by the time my alarm clock brought me back to consciousness, and I was inspired to try this in real life... Only, without the molasses!
I’m pretty sure this technique is actually called “mica outlining”, or at least a variation of it, but for this specific project, I've decided to call it “mica marbling”, as that’s what the end result looks like to me in soap! Before jumping into the “how to” of this design though, I wanted to quickly cover some tips and important pointers to know before creating this design in your own soapy creations at home. With three batches of this technique now under my belt, and only two of them successful, I’ve learned some pretty important “do’s and don’ts” myself!
The first important tip to know is to always, always, always use a fragrance oil which will remain very fluid and on its best behavior in cold process soap. Even the mildest acceleration can result in one epic mess (and failed soap batch)! Your soap batter must remain super fluid the whole time you’re working, as it needs to act as “cocoon”, containing and surrounding the oil-dispersed micas you’ll be incorporating. The picture here is what happens when this technique is attempted using a fragrance oil that accelerates, and this was only mild acceleration!

As you can see, my soap batter wasn’t fluid enough to surround the sides of my mold, so when I unmolded the batch, this loaf of soap tragically died in arms, spilling mica color everywhere, and creating one giant mess! For this technique to be successful, your soap batter must remain very fluid and workable, from the beginning of pour to the end of it.
Another tip: Even when perfectly executed, this design can be a little messy when first unmolded (especially the ends of your soap loaf). Don’t panic if some mica color gets on your hands when you unmold your soap. Eventually (and rather quickly, actually), your soap will absorb the excess mica-in-oil, so that it won’t transfer to your hands when touched. Upon first unmolding though, it can be a little messy, so be sure to have a roll of paper towels nearby when you unmold and cut your batch. This leads me to my next piece of advice... Even the best made plans can go awry, so if you’re using a wooden soap mold and prefer it not get stained, I would highly recommend lining your mold in freezer or parchment paper when making this design. Thankfully, the silicone liners in Nurture Soap’s soap molds don’t stain with this design, and any excess mica washes off, no problem. If you’d like to avoid stains to your wooden mold though, lining it would be ideal.
As for the recipe itself, you’ll want to use a recipe which is nice and slower-moving, to allow you plenty of time to work, but not too slow-moving to where it takes a week before you’re able to unmold your soap! This design technique is initially going to make your soap softer, so I’d recommend using a recipe that’s reliable, and one you’re familiar working with. If you don’t know of one, you’re always welcome to use the recipe that I used (included below)! Speaking of softer soap... Because we’ll be adding quite a bit of extra oil to create this design, I’d highly recommend using sodium lactate in your recipe as well. This will help shorten unmolding time. You can incorporate Sodium Lactate into your recipe at 3% per pound of batch oils. Incorporate sodium lactate by stirring it into your cooled lye solution, just prior to adding the lye solution to your cooled batch oils.
Another highly recommended tip: Dial down that superfat! Any extra oil added to your recipe is going to affect your soap’s lather, and can even put you at higher risk of DOS (Dreaded Orange Spots) developing on your soaps. Always use fresh batch oils which come from reputable soap suppliers (Like Nurture Soap!), and reduce your superfat to no greater than 3% when making this design. Don’t worry, your soaps won’t be “lye-heavy”. The addition of extra oils in this design will make for a wonderfully conditioning bar of soap, and lowering your superfat will ensure your lather isn’t significantly affected. It’ll also increase the lye in your recipe, which will saponify some of that extra oil, as well as help prevent possible DOS from forming. So now that we’ve covered some important tips, let’s jump right in and make a batch of mica-marbled soap!
Making “Marbled Mojito” Soap!
To begin this project, we’ll start with the fragrance oils used! When it comes to mica marbling in cold process soap, another recommendation I’d make is to use a fragrance oil (or oils) that you’ve worked with before, so that there are no unexpected surprises. I decided to go with a fragrance oil blend, that when combined smells positively mouthwatering! Mixing equal parts of Nurture Soap’s refreshing “Mad About Mint” fragrance oil, and their zesty “Ginger and Lime” fragrance oil creates a positively scrumptious aroma that reminds me of a crisp mojito drink! Not only does this combination of fragrances smell delicious, they also remain on their best behavior in cold process soap!

Since I wanted to make this a “high-top” soap design with soap frosting piped on top, the next order of business was to get some decorative embeds made. You can certainly omit piping the top of your own batch of “Marbled Mojito” soap if you prefer, but if you’d like to include it in your soap’s design, melt & pour embeds of lime wedges and mint leaves will go great with this project! You could even add a paper straw to each bar as an extra embellishment, if you’d like! Pictured here are beautifully bold lime wedge embeds in “Jade Green” mica, and adorable mint leaf embeds in “Synergy” mica! Both were made using Nurture Soap’s Low Sweat, Clear Soap Base in Life of The Party-brand molds. You can find these affordable molds at many retailers of bakery supplies. I enjoy ordering mine from a bakery supplies shop called Sweet Treat Supply!

The mica colors for this design will be handled a bit differently. Instead of dispersing each mica colorant in a bit of carrier or batch oils, then incorporating them into portions of soap batter, we’re going to be pouring them, sans soap batter! That’s right... Each mica color in this soap design (not including the main batch color, which for this soap batch is “Winter White” mica) will be dispersed in olive oil, then poured directly into the soap batter in its original, oily state. The effect will be a jaw-dropping marbled look throughout the soap bars! I tried two different ratios of olive oil to mica and found that I liked 2 tablespoons of olive oil per every teaspoon of mica colorant best. You certainly don’t have to pour the full 2 tablespoons of mica-in-oil into your soap design though. This ratio produced the best results in my own soap batches, but you can add as little of this mica-in-oil mixture as you’d like to your soap! Any remaining mica-in-oil can always be saved for future soap projects, and in my own marbled soap batches, I only used about 2/3rds of each 2-tablespoon oil/mica mixture in my soap’s design. For this specific batch, the fabulous mica colors of “Green Vibrance”, “Rainforest”, “Hello Spring!”, “Sea Green” and “Lime Appeal” were used!

The Success of this design (which I learned the hard way!), really depends on how fluid your soap batter is, and remains. The more fluid your soap batter, the better, so when it came time to grab my trusty immersion blender and combine my lye solution and batch oils, I made sure to only blend in short bursts, using my immersion blender to stir the batter between bursts. The second my soap batter reached emulsion, where “ribbons” of separated oil were no longer present in the batter, I stopped right there! The key to ensuring your emulsified soap batter remains fluid lies in keeping those temps low. In this specific batch, both my lye solution and batch oils were allowed to cool to around 84 degrees Fahrenheit.

Once your soap batter has reached emulsion and is a nice and fluid consistency, you can now add your main batch colorant. For this batch, I used “Winter White” mica. Because there aren’t any soap portions to split off and color, you can also incorporate the entirety of the fragrance oil blend in the soap batter as well. Once the colorant and fragrance have been incorporated (most preferably by hand!), you can now begin pouring the design!

So, remember when I mentioned your soap batter acting as a “cocoon” for the micas-in-oil? That’s another important point to keep in mind! You see, if the micas-in-oil aren’t contained within something (Ie: your soap batter), they’ll most likely just leak back out! You really want to think of your soap batter as a barrier which will contain the micas-in-oil within your soap. Ideally, you’ll want all sides of your soap to be covered with soap batter, while concentrating on keeping the micas-in-oil in the center of your soap as much as possible. The ends of your soap aren't as big of a deal, as most soap makers cut their end-pieces off anyway, but you really want to make sure the bottom, sides and top of your soap loaf are adequately covered. To begin pouring, fill your mold a touch over 1/3rd full with soap batter (or more, if preferred), then proceed by pouring the first mica-in-oil color down the very center of your mold.

As you continue pouring, make sure to alternate between pouring your soap batter down the center of your mold, followed by your next mica-in-oil color, so that it becomes a pattern... One color of mica-in-oil gets poured, then the soap batter gets poured right over it, tiger-swirl style. The second mica-in-oil color gets poured, followed by more soap batter. This pattern repeats until your mold is almost filled, and you’ve added all your mica-in-oil colors. As you continue pouring the batch, you’ll begin to notice the micas-in-oil spreading their way ever outward. That’s no problem, and another reason why it’s so very important to work with very fluid soap batter. When you notice your micas-in-oil getting too close to the sides of your mold, simply use your soap batter to “push” everything back to the center of the mold. A quick pour of soap batter up and down the sides of your mold will take care of that!

Once you’ve poured all the mica-in-oil colors into your mold, remember to leave some room near the top. The next step will be to incorporate a hanger swirl into this design, but once finished with that, you’ll want a little room left on top to push and wayward micas-in-oil back to the center of the mold, as well as use remaining soap batter to cover the top of the loaf as best as possible.

The hanger swirl for this marbled design is quite simple and fun, and it’s also the star of the show when it comes to creating that marbled effect in your soaps. To complete this swirl, simply take your hanger tool, and beginning at the side closest to you, insert it just barely below the surface of the soap. Skim the hanger tool across the surface until you get to the center of your mold. Moving the hanger tool in a clockwise direction, begin by making large, circular loops within the soap, gradually moving the tool a little lower with each completed loop. Complete four large, descending loops until your hanger tool hits the bottom of the mold. At this point, drag the tool across the bottom of the mold by about an inch (moving it towards you), then pull it straight up and out of the soap. That’s it! The hanger swirl is complete, and from here, you can use remaining soap batter to fill your mold up the rest of the way; using it to push any micas-in-oil away from the sides, and covering any oil sitting on top as best as possible.


MARBLED MOJITO GARNISHMENTS!
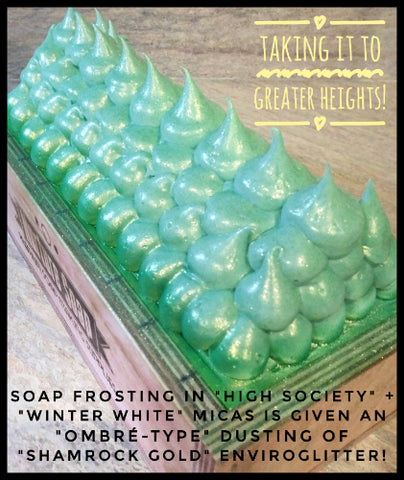
Using the same batch oils and percentages as in my main batch of soap, I returned to a more appropriate superfat (7%) for my soap frosting recipe, and piped the top of the loaf using a Wilton #1A, round piping tip. To color this part of the project, I used, quite possibly, the most insanely beautiful color blend I think I’ve ever seen in soap! If you’ve read any of my previous blog posts, you may already know that I’m positively infatuated with Nurture Soap’s “High Society” mica, and have mentioned several times how incredibly versatile it is in cold process soap! With this one mica, the possibilities to create an array of different colors and shades within the green and blue color spectrums are gorgeously vast!
A blend consisting of one-part “High Society” mica to two (slightly generous) parts “Winter White” mica looked absolutely sublime for this portion of the project, and to finish up with a heavenly dash of eco-friendly sparkle, an “ombre-style” dusting of “Shamrock Gold” Enviroglitter looked positively ethereal! To create this “ombre-type” effect in your own “high-top” soap batches, using one of Nurture Soap’s Glitter Spray Pumps (As I’ve found these are the absolute best tools for distributing fine Enviroglitters to the tops of soap!), simply start by spraying a more concentrated amount of glitter around the base of your soap, then gradually decrease the amount as you spray your way up to the very top of the soap frosting.
For that perfect finishing touch, I happily placed each fun and fresh-looking melt & pour embed atop my soap frosting and called it a day! I lovingly insulated the batch under a cardboard box and blanket, then waited (impatiently!) for when I’d be able to unmold and cut the batch. I couldn’t wait to see what this batch would look like once cut, as the magic of this design technique is that each and every bar looks so completely different and unique from any other! Each batch, and each bar of soap is truly one-of-a-kind, and no single batch will ever be identical!

DON’T DROP THE SOAP!!!
“Don’t drop the soap!” is a well-meaning piece of advice I’m sure we’ve all heard before. It’s usually said in jest, and seems to be in reference to individuals serving time in prison. Clearly, this has to do with the fact that shower floors in prison must be teeming with all sorts of icky germs, and carries absolutely no other innuendos! It also just so happens to be outstanding advice for soap makers too! You see, when the time came to unmold my batch of “Marbled Mojito” cold process soap, I discovered it was still quite a bit soft, and wasn’t ready to be unmolded just yet. Ideally, considering the extra oils in this recipe, and how fluid the batter is when poured, I’d actually recommend allowing this batch to remain in the mold for a good 48 hours before unmolding, but I was on a deadline, and needed to get this batch unmolded and cut STAT!
By being as gentle as a feather, I managed to unmold the soap loaf with no incident, but it was still pretty soft and not quite ready to cut. Getting it unmolded was the first hurdle though, as now that each side of the loaf was exposed to air, it would firm up much faster than if it had remained in the mold. Unfortunately, the weather outside was wet and rainy, and I worried this would slow things down significantly. Suddenly, I had a bright idea! I’d just move the loaf into the next room and crank the dehumidifier up full blast- problem solved! As if cradling a baby bird, I carefully picked the loaf up, turned to start walking to the next room and almost tripped over the damn cat (She has a thing for creeping up on people, standing directly underneath you, and then getting all kinds of offended when you nearly break your neck trying not to trip over her!). In an effort to save both myself and the cat from bodily harm, I teetered, and I tottered, and accidentally DROPPED THE ENTIRE LOAF ON THE HARD KITCHEN TILE!
MY stomach immediately found a new home, up in my throat, and I felt tears of utter frustration coming on strong. I looked at the damage and found one side to be completely destroyed, with the bottom sides and corners badly squashed. Looking back, I wish I would’ve taken a picture of how bad it looked, but I was so upset and devastated, all I could think about was trying to salvage it as best as I could. Naturally, I couldn’t use any of the soap that had come in contact with the floor, but I began collecting as much of the soap that hadn’t touched the floor as I could. It was so soft and malleable, I was able to roll it up into little balls with my hands, then use an icing spatula to reattach it to the loaf. For the next hour, my poor soap batch went through extensive reconstructive “surgery”! One side was beyond repair, but I hoped with all hope that after cutting and trimming the edges of each bar (as I always do anyway), I’d have at least ONE decent bar to show you all, so you could at least get a good idea of what this design technique looks in the finished soap.

FOLLOW YOUR DREAMS!
I’d like to thank my subconscious Steve Buscemi, and his little, fluffy dog, for giving me the idea and inspiration for this soapy project! By some complete miracle, when I cut and trimmed this batch, only ONE bar out of the entire loaf was moderately damaged! I have absolutely NO CLUE how that was even possible, but I like to think it’s because this idea came to me in a dream; which I also like to think must’ve been some sort of sign, beyond an over-active imagination, or eating sweets too close to bedtime! Perhaps it was meant-to-be; “fate”, if you will! Whatever it is, I’m thrilled with the results of this project, and am so pleased with how the soaps turned out, despite my little dropping “incident”! As you go throughout your soapy week, I hope inspiration finds you in its own unique way as well, and that you never hesitate to follow your dreams, no matter how odd they may seem... Even if they come to you by way Steve Buscemi, or whatever “marbled molasses” is!


SOAP RECIPE:
- Sodium Hydroxide (Lye) @ 3% Superfat
- Distilled Water @ 30% Lye Concentration (2.33:1/Water: Lye)
- 40% Olive Oil
- 30% Coconut Oil
- 25% Palm Oil
- 5% Castor Oil
- 3% “Mad About Mint” Fragrance Oil
- 3% “Ginger & Lime” Fragrance Oil
- 3% Sodium Lactate (*Optional, Added to Cooled Lye Solution)
- 1/2TBS/PPO White Kaolin Clay (*Optional, Mixed Directly into Fragrance Oil Blend)
- 2TSP/PPO “Winter White” Mica
- Following Micas, Dispersed in Olive Oil at 1TSP Mica to 2TBS Olive Oil: “Lime Appeal”, “Hello Spring!”, “Rainforest”, “Sea Green” & “Green Vibrance”
Soap Frosting Recipe:
- Sodium Hydroxide (Lye) @ 7% Superfat
- Distilled Water @ 33% Lye Concentration (2:1/Water: Lye)
- 40% Olive Oil
- 30% Coconut Oil
- 25% Palm Oil
- 5% Castor Oil
- 1-Part “High Society” Mica + 2-Parts “Winter White” Mica (*Blended to Equal 1TSP/PPO)
- Melt & Pour Citrus Wedge Embeds in “Jade Green” Mica
- Melt & Pour Mint Leaf Embeds in “Synergy” Mica
- “Shamrock Gold” Enviroglitter
- Wilton #1A Piping Tip